Wednesday, September 29, 2010

Immersion Blender

Although this blog is directed toward Tips on food, this needs to be said.

My first mistake in Kitchen gadgets was listening to all of the accolades on the “net” about how wonderful the thing is, it is in the Top 10 most useful gadgets on many a list. Well I bought one! Wrong decision big waste of money.

Summary: The immersion blender has been around for home use about 20 years. Also called a hand blender or stick blender they have a blade on the end of a shaft allowing it to blender in any container. Its primary purpose is pureeing small amounts of soups, sauces or smoothies. They have a tendency to splatter when placed in a liquid and turned on. They are also capable of chopping garlic, nuts or any small portion of vegetable.

Unfortunately, I don’t like “smooth” soup, I don’t even make soup, and sauces are better handled with a whisk. The other major “use” is whipping cream –NOT So! Use an ICI cream whipper with a N2O cartridge – it does it professionally and dispenses beautifully.

If you want a cream soup, and purred soups, go for it. Otherwise save your hard earned cash.
Just in case the thought is I got the wrong one – It’s the top rated Cuisinart! Anyone need a slightly used blender? It's going in the Yard Sale next week.     

11/12/10   SOLD IT TODAY thank god!

Tuesday, September 28, 2010

Red Pepper Flakes (Crushed)

On many occasions the ingredient list in a recipe call for “red pepper flakes” well darn, ya’ can’t find ‘em. There’s crushed red pepper, powdered cyan pepper etc., but no flakes! Well here’s what to do: Go to a Chinese or Asian grocery store or market and buy a bag of died red peppers. They are very inexpensive less then a dollar, and they fill the bill.

When called for, take one or more of the peppers and cut each carefully into about three pieces across the grain. Them take the pieces and shake out the seeds. Now you have the pepper - just hold it in your fingers and crush it. Voila red pepper flakes.
I know there are those who swear by the “whole” thing, but I just don’t like the texture of the seeds in an otherwise delicate dish.
When you’re done with them, seal the package and put it in the freezer for the next time. Why you might ask? Well in the really hot weather, you could be surprised with an infestation in the package. An ounce of prevention goes a long way.

Monday, September 27, 2010

Separate an Egg

Separating an egg white from the yoke is not a difficult task. It can be easily done WITHOUT any gadgets.

A few simple actions and knowing what to do are all that is needed:

First start with a glass bowl or preferably a measuring cup with a reasonably sharp edge(The rolled edge of metal bowls tend to crush the shell rather then cracking it.)
Taking the egg in your fingers and tap it at a 45 deg. angle against the inner edge of the rim. We are trying to produce a crack, not crush the shell or break it in half.

Next, take the cracked egg in both hands, using your thumbs, start to separate the shell halves. When it starts to open turn the egg upright so as to capture the yoke in the lower half of the shell. Completely separate the top half and let the white run into the bowl or cup.


Now take the top half and hold it open side up over the bowl and slowly pour the white out of the bottom half. As the yoke approaches the shell edge, quickly pour it into the lower shell so it does not touch the edge (The yoke will break if it touches the edge of the shell).

Once again repeat this process until most of the white is in the bowl below.

It sounds a lot more complex then it is. Often time’s eggs go on sale for less then $0.99 a dozen or that become out dated. Buy a dozen and just practice – you’ll be surprised at how easy it really is.

Two points to keep in mind – try to crack the shell at the middle and pry it open gently.
Don’t smack it hard against the edge – we want a crack, not a shattered shell.

Do not let any of the egg yoke fall into the bowl or cup if you plan to beat the whites. The presence of the yoke will keep the whites from whipping properly.

PS my wife adds that you can remove parts of the yoke from the bowl with the sharp edge of the shell, also any chips of shell that might fall in.

Sunday, September 26, 2010

Herb and Spice Substitution Chart

Herb/Spice                                Use:
Allspice                cinnamon; dash of nutmeg; or dash of cloves
Aniseed                fennel seeds: a few drops anise extract
Basil                     oregano; thyme
Cardamom           ginger
Chervil                  tarragon; parsley
Chili powder         dash of hot pepper sauce, oregano and cumin together
Chives                  green onions; onion; or leek
Cilantro                parsley
Cinnamon             nutmeg; allspice (reduced by 1/4 the amount)
Cloves                  allspice; cinnamon; or nutmeg
Cumin                   chili powder
Ginger                  allspice; cinnamon; mace; or nutmeg
Italian seasoning    a blend of basil, oregano, rosemary, and ground red pepper
Mace                    allspice; cinnamon; ginger; or nutmeg
Marjoram             basil; thyme; or savory
Mint                     basil; marjoram; or rosemary
Nutmeg                cinnamon; ginger; or mace
Oregano               thyme or basil
Parsley                 chervil or cilantro
Red pepper          dash of hot pepper sauce; black pepper
Rosemary             thyme; tarragon; or savory
Saffron                 dash turmeric
Sage                     poultry seasoning; savory; marjoram; or rosemary
Savory                  thyme; marjoram; or sage
Tarragon               chervil; dash fennel seed; or dash aniseed
Thyme                  basil; marjoram; oregano; or savory

Cleaning Stainless Steel

Cleaning Stainless Steel and Calphalon cooking utensils is generally pretty easy, but as time goes on, they can get spotted and show signs of food residue. Well the best thing to come to the kitchen found its start in the Bar. That’s right Bar Keepers Friend. A powder that’s easy to use removes the “residue” and removes dishwasher spotting with relative ease and brings your Stainless Steel back to like new. Funny it’s been around since 1882

Actually it works well on most Stainless surfaces (Not Painted)

Ginger - Selecting, Peeling, and Preparing

Ginger: It’s used a lot in Chinese recipes and is gaining prominence in other culinary arenas. Preparing ginger for use;

First: and most important, select a piece with smooth skin and a single arm. You may break of a piece that is appropriator as it is sold by weight. The part to the left of the line is perfect

Peeling: and preparing for use: With a sharp knife cut the ragged- broken end to eliminate any dried or ragged stuff. Then cut of the amount needed thur the diameter. Using a vegetable peeler, peel the outside of the disk you just cut off. This should be easy if you first selected a piece with a smooth skin.

Mincing: Lay the disk on a cutting board on one of the faces. Reach for your heaviest chief’s knife or a cleaver and WHACK the disk with a resounding thump. There should be a small pile of fibers, juice and pulp; Now take your chiefs knife and work the knife with a slight rocking motion until you have it all cut.

Grating: Hold the disk by its two flat sides and just grate as usual.

Easy Grill Grid Cleaning

"Easy" Grill Grid Cleaning
After grilling, it’s a good idea to give the grill grids a cleaning. Here is a simple and relatively easy way to attend to it. First wait for the grill to cool some what, so you don’t burn yourself.
Then here’s the trick, using a course stainless steel scouring pad, a pair of long tongs and a spritzer bottle of water. Clamp the pad in the tongs, using a glove, spritz the grids with the water and scrub with the pad. Spritz – scrub, Spritz – Scrub etc. and you will quickly get back to the grid metal. It sounds much worse then it is. If the grids are really bad use a scraper or stiff brush, scrape off the heavy residue.

By the way if you don’t own a pair of tongs, you should have them anyway as they are good to move the coals around and absolutely a must to turn a steak. Piercing with a fork is no good it lets the juices run out!

Chimney Charcoal Starter

The chimney starter for charcoal is fairly new to the grilling scene but is a wonderful addition. No chemical flavors are added to the dinner!

A chimney starter is a round tube with large holes around the lower part for air. There is a heavy grill in the bottom (preferably tapered) to support the charcoal briquettes. There is also an extended handle to move it once it is hot. My preference is the one made by Webber (Available at Lowe’s for around $15). My preference is based on it’s inclusion of the important features and is well built.

How to use it: First turn it with the holes and gill facing up. Take two full sheets of newspaper and roll on the diagonal into two separate tubes about ¾ to 1” in diameter. Take each and line the bottom around the outer rim up against the grill.

Turn the starter right side up and place it in the grill and add the charcoal. For most grilling I fill it a little over half full. With a match start the paper thru one of the holes in the base. It will start smoking at first, and then start burning in the base. In about 15 min. flames will be coming out of the top. When the briquettes show a white ash it’s time to dump it into the grill. Do this carefully, using a glove, grab the insulated handle in one hand and the loop/movable handle in the other. Spread them around, replace the grill and your set.

REMEMBER THE SARTER IS H-O-T !!! Place it on a non-combustible surface to cool. When it cools store it out of the weather as it will rust

Pinch, Dash and Smidgeon

In-Exact measures – Pinch, Dash and Smidgeon
Well strange as it may seem, a pinch comes from a time when dry spices where stored in a spice box. The drawer would be opened and the spice would be “pinched” between your forefinger and thumb. Many believe it is an inaccurate measure, but the culinary arts aren’t rocket science.
A pinch, dash and a smidgen all refer to a small quantity.

The dash generally referring to a liquid dispensed from a container with a restricted opening. The “smidgeon” can refer to either and is about ½ of a pinch

Spritzer Bottle

The ones used to mist house plants. Fill it with purified water and keep it near the grill. If and when the fire flares up, spritz it a couple of times to knock the flames down. Need for frequent spritzing is a sign of excess fat on or in your meat.

In the future, trim off most of the fat, or purchase leaner ground meat.

Cooking Sherry or Cooking Wine

Click to enlarge
Cooking sherry or cooking wine is typically a poor quality sherry or wine to which a quantity of salt has been added. The reason is to avoid the “Alcohol tax” as the salt renders it pretty much undrinkable. The added salt will flavor the final dish, usually unpleasantly.

Here a good rule of thumb is “if you won’t drink it, don’t use it to cook with”. The purpose of cooking with sherry or wine is to add the flavor and complexity to the dish, as the Alcohol evaporates during cooking.

Water logged Root Vegetables

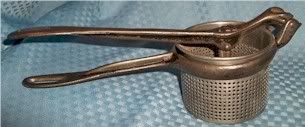
Cast RicerThe Ricer:
Not a known item today, but it is the only way to make mashed turnips, parsnips and other root vegetables that don’t come out water logged.

Here's how: Peel and boil turnips etc. chunks as usual. Drain off the water and place them in the ricer basket and put the plunger in place. Gently squeeze over the sink as the water comes out. When the water ceases or just as the turnips begin coming thru the mesh, move over a bowl and SQUEEZE. The turnip pulp will come thru the holes and the stringy "stuff" will stay in the basket. Clear the basket with a fork and fill it once again – same thing until they are all squeezed. When you’re done, add some butter, salt and pepper to taste, mix and serve the best turnips ever.

Unless you don’t mind small bits of skin in your mashed (whatever) I’d peel them first. Just did some Sweet potatoes and the skins actually added a brown tinge and skin specks. Not to my wife’s likin’

I use an old fashioned cast Ricer as pictured, but you can buy a good Stainless one from Cuisipro.

Cooking Temperature Chart

Buffalo, Beef  and Lamb
Roasts, Steaks & Chops
Rare:                 120 to 125 degrees F            center is bright red, pinkish toward the exterior portion
Medium Rare:  130 to 135 degrees F            center is very pink, slightly brown toward the exterior portion
Medium:            140 to 145 degrees F            center is light pink, outer portion is brown
Medium Well;   150 to 155 degrees F            not pink
Well Done:        160 degrees F and above      steak is uniformly brown throughout

Ground Buffalo:
Rare:                                                                125° to 130° F
Medium-Rare:                                                  130° to 140° F
Medium:                                                           140° to 150° F
Medium-Well:                                                  150° to 160° F
Well Done:                                                       Not Recommended
             
Poultry Cooking Temperature Chart

Poultry (Chicken & Duck):   165º - 170º cook until juices run clear

Turkey:  165º - 170º  juices run clear - leg moves easily

Stuffing (cooked alone or in turkey) :165º - 170º

Pork Cooking Temperature Chart
Roasts, Steaks & Chops
Medium                       140 to 145 degrees F    pale pink center
Well Done                   160 degrees F and above          steak is uniformly brown throughout

Pork ribs, pork shoulders, and beef brisket
                                    160 degrees F and above          medium to well done

Sausage (raw)            160 degrees F    no longer pink
Ham”
Raw                             160 degrees F     
Pre-cooked                 140 degrees F   

Fish and Seafood Cooking Temperature Chart
Fish (steaks, filleted or whole)     140 degrees F       flesh is opaque, flakes easily
Chilean Sea Bass:  130° to 132° F     
Tuna, Swordfish, & Marlin:          125 degrees F       cook until medium-rare (do not overcook or the meat will become dry and lose its flavor
                                                        
Shrimp                                 
Medium-size, boiling:   3 to 4 minutes  
Cook until medium-rare (do not overcook or the meat will become dry and lose its flavor
Large-size, boiling:       5 to 7 minutes  
Cook until medium-rare (do not overcook or the meat will become dry and lose its flavor
Jumbo-size, boiling:      7 to 8 minutes  
Cook until medium-rare (do not overcook or the meat will become dry and lose its flavor
                                                        
Scallops                               
Bake                            12 to 15 minutes           milky white or opaque, and firm
Broil                             until milky white or opaque, and firm

Disclaimer: I do NOT recommend not following the FDA cooking temperatures – They are set to reduce the chance of getting food born illnesses.

Saturday, September 25, 2010

Carving a Pepper

Peppers; Sweet Red, Green, Yellow or orange. Here is my unique approach to “Carving a pepper"*. It may seem cumbersome, but I assure you, do it a couple of times and you won’t go back to your old ways.
First wash the pepper, then take a paring knife and cut as close to the green “flower" stem as you can. You only need to go in 1/2 inch. Now turn the pepper over so the bottom is facing you. You should see either three or four lobes coming out from the center. Take your paring knife, starting in the center and follow the depressed rib that form the lobes and cut all the way up to the circle you cut earlier. Do the same with each depressed area making either 3 or 4 cuts. Now you should be able to peel each section off leaving the core attached to the last section.
Now again take your paring knife and slice the “white rib” off the sections. You will note there isn’t any in the center of the sections. Peel out the core and wash again. Now just cut in strips or pieces as needed.
* NOTE: I’m assuming you Don’t plan to stuff or use them whole or as half’s.

Gill Temperature - Judging

Place your open palm about 4 to 5 inches over the coals. The length of time you can hold it there is a perfect judge of the grill temperature.

2 to 3 seconds is high – at least 450 deg. or more.

4 to 5 seconds is med-high – 400 deg. (Between 375 – 450)

6 to 7 seconds is medium – 350 deg (Between 325 -375)

8 to 9 seconds is low - 300 deg (Really to cool to grill

11 to 15 seconds - 250 deg. (Good for long term smoking)